Sourdough English Muffins
Sourdough English Muffins are a delicious use for sourdough starter discard removed when feeding and easy enough for novice bread makers. You can even turn the dough into an incredibly tasty breakfast bread instead of individual muffins!
Note: This recipe received a major update in 2020 with lots of new tips and tricks, a variation for a bread loaf, and more.
What readers say
“My new Sourdough English Muffin recipe. 3rd time making them in 3 days and consistently come out perfect!👍🏼“
Brigette
“Hands down my favorite sourdough recipe ever. I make the loaf version of this and I make multiple loaves every week. I can’t get enough of it.“
Priscilla
There are few things I enjoy more than some toasted sourdough with butter. The sourdough english muffins give me an excuse to enjoy that all year round!
With no need to heat up the oven these have become a weekly staple in our home. If you are new to sourdough bread, this is an easy recipe to use sourdough discard! It’s also such a great recipe if you are fairly new to bread baking in general as you can use the dough for English muffins or bread loaves.
Ingredients you need
- Unfed sourdough starter
- Milk
- All purpose flour
- Sugar
- Salt
- Baking soda
- Cornmeal
What is sourdough discard?
Sourdough discard is the sourdough starter that you remove before you feed your starter. You can just discard it (hence the name) or you can use it in different recipes like this one. You can also use sourdough discard in Sourdough Waffles, Sourdough Pancakes, Sourdough Naan, or even Sourdough Banana Bread!
Where do you get sourdough starter? You can make your own sourdough starter, get starter from a friend, or you can buy dehydrated starter (affiliate link).
Substitutions
Some people in the comments have suggested swapping the sugar for honey. It gives the muffins a slightly more rounded flavor. Feel free to use whatever you have most accessible.
Other commentators have shared their experimentations with mixed flours:
- Mo said, “I used some whole wheat flour (about 25% of the flour I subbed in with whole wheat flour).
- Bree said, “I made mine with gluten free brown rice starter and gluten free cup for cup flour. I did maybe 1/4 less flour than the recipe calls for.”
Can I use dairy free milk?
You can use a non-dairy milk if you need. I have successfully used lactose-free milk, coconut milk, and almond milk for this recipe.
How to make sourdough English muffins
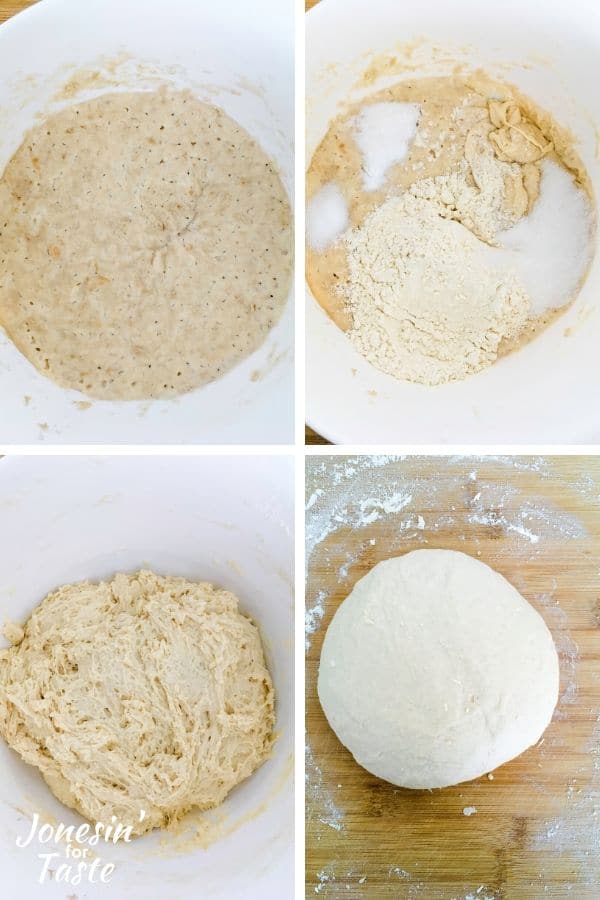
- Make your sponge and cover with plastic wrap. Leave out for at least 8 hours, or overnight.
- After the overnight rest, add the remaining ingredients and mix well.
- Turn onto a lightly floured board and knead until the dough is smooth and elastic.
What is the purpose for the overnight sponge?
The overnight sponge helps to develop the flavor of the dough. It is one of the opportunities for the dough to rest and ferment. Overall, the longer you can take with each step, the better the flavor.
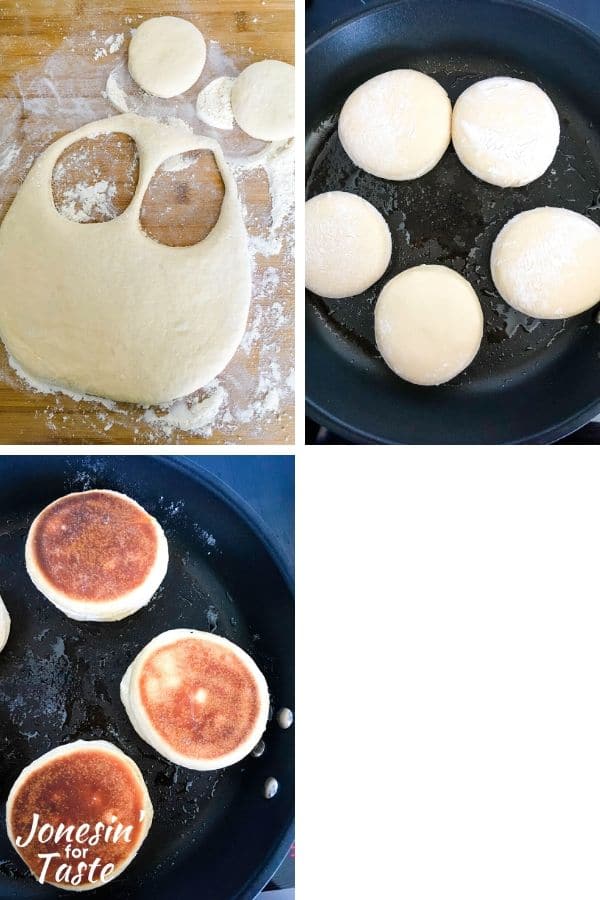
- Roll out dough to 1/2″ and cut into rounds using a 3″ cookie or biscuit cutter. If you prefer bigger muffins for breakfast sandwiches, use a bigger biscuit cutter.
- You can re-roll the scraps but you need to let the dough rest at least 10 minutes before cutting more muffins from them. (see tips from the readers below for ways to reduce re-rolls)
- Place muffins on a piece of parchment or cookie sheet dusted with cornmeal. Let rest for at least 45 minutes (for more nooks and crannies see tips below).
- Spray griddle or skillet lightly with oil. Heat to medium and cook muffins until browned on top and bottom and cooked through (internal temperature should be 195°F).

Tips & Tricks
- I find they cook up best on a cast iron skillet versus a traditional skillet. Some readers have found they prefer cooking them on an electric skillet because they can more easily adjust the temperature.
- The English muffins should be no thicker than 1/2″ or they will be too thick and won’t cook.
- If the heat is too high, the outside will cook before the center is cooked. If you find the center is still doughy, lower the heat.
- If the center is still slightly underdone you can always stick them in the oven at 350°F for about 5-10 minutes until they are done.
- Use a digital kitchen thermometer to make sure the muffins have cooked through. They should be between 195° and 200°F
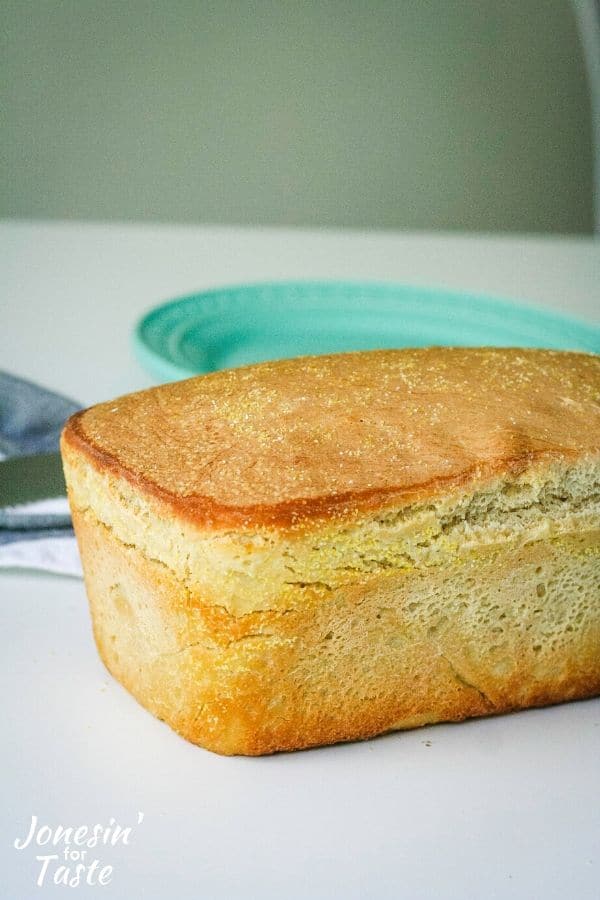
Can you use English Muffin dough to make bread?
I have gotten a lot of love on my Sourdough English muffin recipe about how wonderful they are but I’ve also gotten a lot of complaints about how long it takes to cut them out and leave them to rest, etc.
Well, I now can tell you that you can make excellent bread with the same dough and that it is far less effort to make! The sliced bread would also work for our favorite lunchtime staple- Simple Sourdough Pizzas.
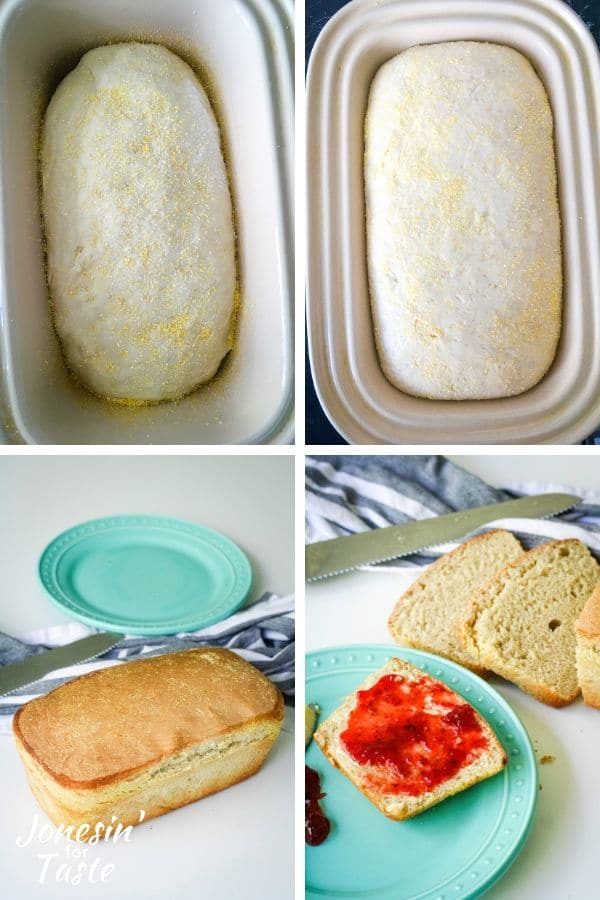
How to make English Muffin Bread:
*Follow the first two steps of the recipe to make the overnight sponge and then the dough.*
- Turn the dough onto a lightly floured board and knead until dough is smooth and elastic. Roll the dough into a log shape.
- Grease a loaf tin with cooking spray and lightly dust with cornmeal. Place your bread loaf into the pan. Sprinkle a little more cornmeal over the top of the loaf. Cover with plastic wrap and keep in a warm place until the loaf has risen to the top of the pan.
- Bake until bread is a light golden brown on the outside.
- Carefully remove bread from the loaf tin and allow to cool completely on a cooling rack before slicing.
Tips
Tips for making this as a bread instead of muffins
- The amount of time it will take for the bread to rise will depend a lot on the warmth of where it is rising. A long slow rise will give you a better sourdough flavor so don’t necessarily be in a hurry to speed along the proving process.
- I did store my bread pan covered in the fridge overnight before cooking so if you want an even stronger sourdough flavor you can do that.
- The bread does not have lots of nooks and crannies and a big part of that is having to slice the bread. But the bread tastes fantastic so I haven’t minded the lack of little pockets for the butter to pool.

FAQs
How can I get more nooks and crannies?
The number one question I get is on how to get more nooks and crannies. I have my suspicions that commercial English muffins have yeast added to give them more rise and therefore more nooks and crannies.
But don’t fear! There are ways to help encourage more little cavities to pool with butter.
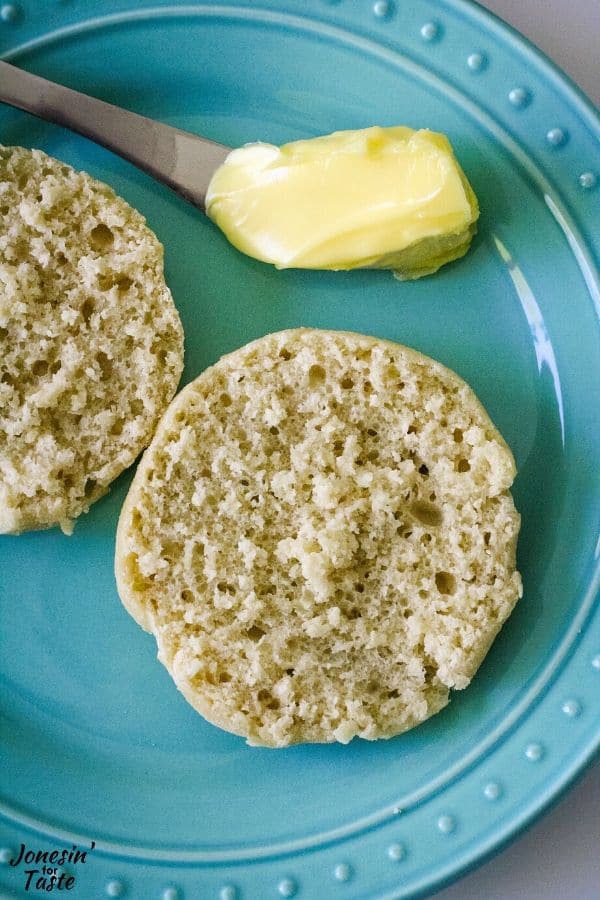
For more nooks and crannies, the best way is to allow the English muffins to rest for longer after cutting them out. I’ve let them rest for over an hour and a half which gave me the results in the picture above.
Also, always make sure you use a fork to stab all the way around the muffins to separate the halves instead of using a knife.
Tips from YOU!
- One reader subbed sour cream for 3/4 of the milk which she said resulted in a wonderfully soft muffins which stayed that way for days. A great tip if you find you are running low on milk.
- Multiple readers offered tips for making these in the oven. Use a baking steel or baking stone in the oven at 275 degrees F baking for 7-8 minutes per side.
- Some suggestions for reducing the number of times needed to roll out the muffins were to cut square muffins or to roll the dough in a log and cut out slices.
Other easy bread recipes to try:
- Bread Machine Oatmeal Breakfast Bread
- Bread Machine Coconut Bread
- 90 Minute Whole Wheat Parmesan Rosemary Rolls
Do you follow Jonesin’ For Taste on Facebook? Stop by, say hi, and let me know what kinds of recipes you want to see!
Recipe
Equipment
- 3" cookie cutter
Ingredients
- 1/2 cup sourdough starter
- 1 cup milk
- 2 3/4 cup all-purpose flour
- 1 Tablespoon sugar
- 3/4 teaspoon salt
- 1 teaspoon baking soda
- cornmeal for dusting
Instructions
- Combine starter, 2 cups flour and milk in a large bowl. Stir to combine, cover with plastic wrap, and leave out for at least 8 hours, or overnight.
- After the overnight rest, add the remaining flour, sugar, salt, and baking soda and mix well.
To make muffins
- Turn onto a lightly floured board and knead 4-5 minutes until dough is smooth and elastic.
- Roll out to 1/2" and cut into rounds using a 3" cookie or biscuit cutter. You can re-roll the scraps but you need to let the dough rest at least 10 minutes before cutting more muffins from them.
- Place muffins on a piece of parchment or cookie sheet dusted with cornmeal. Let rest for at least 60 minutes (longer is better).
- Spray griddle or skillet lightly with oil. Heat to medium-low and cook muffins for about 6-8 minutes on each side or until browned on top and bottom and cooked through.
To make bread
- Turn the dough onto a lightly floured board and knead 4-5 minutes until dough is smooth and elastic. Roll the dough into a log shape about 9″ long.
- Grease a loaf tin with cooking spray and lightly dust with cornmeal. Place your bread loaf into the pan. Sprinkle a little more cornmeal over the top of the loaf. Cover with plastic wrap and keep in a warm place until the loaf has risen to the top of the pan, about 2-3 hours.
- Bake in a 350 degree F oven for 30-35 minutes or until bread is a light golden brown on the outside and reaches an internal temperature of 195 degrees F.
- Carefully remove bread from the loaf tin and allow to cool completely on a cooling rack before slicing.
Notes
Nutrition



Just made these and they turned out great! My notes:
I started these late Friday for sunday football. Made them while doing other things.
I subbed a plant based milk (almond) and they turned out great; so can be adapted for vegan recipe.
When kneading after the 2nd flour addition I ended up adding a bit more flour. My starter tends to run very hydrated, and thus my dough was really sticky, so it worked to add flour (less than a 1/4 cup) until it felt “right”. A nice soft, almost sticky, dough.
After cutting and forming, I let rise for a couple hours, then placed in the fridge until the next morning. Took them out about an hour before cooking.
When cooking, I placed a cover over the iron skillet to steam; much like you do with sough dough bread, for the first side only. Flipped after 6 mins each side and then kept flipping until I got a good color.
Lots of bubbles in dough while cooking which means lots nooks and crannies.
Thank you for sharing! I love finding ways to use my starter discard. Will definitely be on my regular rotation.
Thanks for sharing what you did Jamie. I’ll have to try the steaming trick!
How shall these be stored if they will be eaten over a week? Ziplock on countertop or frig? If you’re freezing them, do you suggest leaving them whole or opening them with a fork or slice with knife first? Thank you!!
Hi Chisun, if you know they will all be eaten over the week I would just keep them in a ziplock on the countertop. I usually freeze ours because I am making a big batch to last a while and we don’t eat them every day. Sometimes they can turn gray which from what I can figure out is from the reaction of the sourdough to the baking soda. It hasn’t affected the taste ever for us and it doesn’t always happen, especially if I get them in the freezer right away. I open them with a fork after I thaw them but I don’t think you can go wrong with prepping them pre-freezing.
First time making these. Turned out beautiful, fluffy and tasty. Thanks so much!!
Can you tell me what size cutter you use to get 12 muffins from the recipe. Most English muffin recipes call for a 3 inch round cutter.
I also used a 3 inch cutter. Thanks for asking.
Just perfect. I live in Israel and you can’t get English muffins here. They came out just as I remembered them. Great way to use up my discard. Thanks, this is a keeper for sure!
Great recipe and so easy!! New to making English muffins, very happy with the results!! Delicious!
So glad you found this recipe helpful Diana!
Very easy recipe and has turned out perfect from the first try.
These are amazing. I am new to sourdough baking and loving it. I decided to give your recipe a try and I am glad I did. I am never buying English muffins again. These were super easy to make and they tasted great.
I have no idea what I did wrong…. when it came time to knead the dough for 4-5 minutes, I just got a sticky mess. Finally got it kneaded enough and rolled out that I just simply cut it into squares as I was mad as heck by then. I had to keep dusting it with flour to keep it from sticking to my hands. Where did I go wrong here? They’re cut and resting to rise now. Waiting to cook.
Hi Sharla, I’m so sorry you had some problems! With bread there is always a lot of trial and error. A couple reasons why your dough may have been really sticky: a higher water ratio in your starter, how humid your home is, what kind of flour you were using. Different kinds of flour (I’ve found even different brands) can have different absorption levels. On humid days, you may have to add a lot of extra flour to get the right consistency. If you find it is really wet like that again, you can try adding flour a 1/2 cup at a time until you get a more workable dough. However, you can still get good results with a wet dough but it will take longer during the kneading process for it to come together. You can try using a stand mixer for the kneading with a wetter dough or skip the flour and just keep working the dough. You may have to use more of a slap kneading technique and knead for longer but eventually the dough will become less sticky and messy. Good luck!
I had even made a note to myself to use my KA and forgot. I think it would have helped. I’m just about to cook them, I let them sit a while longer as I got distracted. I’ll make some notes about the flour and give it a try again. I have some honey that I got at the market and also from a neighbor that went to Guatemala, can’t wait to taste test them!
I have made these 4 times now and they are just so good and so easy. I made the loaf once, when I was in the middle of too many things to mess with the actual muffin prep and then the muffins themselves 3 times. I have made with all milk, with some sour cream and the rest milk, and lastly with 50% milk and 50% Greek Yogurt. All were great. I also added cinnamon and raisins to a couple of batches; these were my favorite. I always make into a log and slice -then form into the muffins shape. The yogurt batch made the easiest dough to do this. The all milk worked but was more sticky. I have used “fresh” unfed starter and that which had been in the refrigerator for several days and both worked fine. Thank you for the great recipe and providing the alternative options!
Oo my goodness! You have been one busy baker. I will have to try my next batch with cinnamon and raisins because that sounds heavenly!
Is it best to use fed proofed starter or is using the disguard before feeding good? I am new to sourdough
You can absolutely use the discard for this!
Looks great!! Sourdough english muffins should not be overlooked and my customers have been churning them out. Mini plug if its allowed: If anyone needs a boost to the process of making their own starter or wants a unique starter I am helping people with my quite quite active starter at kensingtonsourdough.ca! happy baking everyone.
These turned out much lighter than the batch I made a couple of weeks ago that called for yeast but my starter is also a little sluggish due to changing temps and density may have been due to low hydration and high elevation. I’m still learning to adjust recipes for baked goods at 7,200 feet! The dough was somewhat sticky and a little hard to handle so the muffins were not as pretty as the yeast-risen batch but great taste! Thanks for sharing the recipe!
These tasted great! Like others that commented, I got distracted and ended up adding all the flour . I followed the other steps, and got a good rise while on the griddle.. but i did not get the tell tale english muffin holes in the dough that I expected. Where might I have gone wrong?
This recipe turned out very nicely – I’m going to experiment with just a bit more liquid on the next batch to see if higher hydration makes bigger holes for “nooks and crannies.”
I didn’t cut shapes – I divided the dough evenly by weight (the 105-110 g range makes the classic size), made balls in a typical dough-making way (folding corners, rolling and pushing in the seam on the counter – look at most breadmaking videos to see an example), gently pressed the ball into a 1/2 inch round. It turned out to be almost as uniform as a cut muffin, less time and hassle and I didn’t notice any difference in crumb or texture from your picture.
I live alone, so I left two muffins out for the 60 minute rise, and froze the others on a shallow tray after dipping in cornmeal. To defrost, I left in the fridge on a tray overnight, then on the counter until fully thawed through (at least an hour). The dough has to be completely thawed in order to rise properly in the oven or pan, but If you don’t try and rush it and let it fully thaw, you’ll get just as good a final result.
Please let us know how the the higher hydration works! Your method of making the muffins individually is quite clever and thank you for the additional tips on freezing the muffins! I know others will benefit from what you have shared.
I’ve been making one batch of these every week for the last month. I had seen another recipe that called for greek yogurt instead of milk so I have been using 1/2 cup greek yogurt mixed with 1/2 cup of milk (a buttermilk substitute) and I think the probiotics in the yogurt really give a boost to the starter. I also punch them out with a large coffee mug and get about 8/batch. My family and I have been absolutely loving these. I also cook on a large electric skillet 8 min each side, and then put them on a jelly roll pan and bake an additional 8 min each side in 350 oven.
Thank you for sharing your method Jessica!
These have to be the best English Muffins I’ve ever tasted. Tender in the center and crisply toasted, they are incredible with just a touch of butter.
Hi Jade. I’m going to make the English muffin bread. Planning to bake it in the morning.
If I put the loaf in the pan overnight in the fridge, what is the routine for the am? Should I bring it to room temp or bake it cold? Does it need more time to rise? Thank you very much. I’ll just wing it. Thank you for the recipe and all the comments sound amazing. I’ll update this tomorrow
These are great! Has anyone let cut muffins sit overnight? How’d they turn out.
Awesome recipe, easy to make and lovely rise while cooking. First sourdough starter discard recipe I’ve tried and I can’t be happier with the results. Beats storebought, even if it doesn’t have as many nooks and crannies. Thanks so much! I’m looking forward to trying your naan recipe soon too. 🙂
Hi Jade I would like to know if it’s ok to use starter that hasn’t been fed for 5 days.
That is just fine.
These are unbelievably delicious. I followed the directions exactly, and they are perfect. The height is impressive!
Made these with my Alaska Sourdough starter from Positively Probiotic. Nice recipe! Thank you.
I used oat milk and they were delicious! Also accidentally mixed all the flour at first, cooking with children is distracting, but they still turned out great. Made them a few times now and it’s a weekly routine to make a double batch to freeze. Thank you so much for the easy and forgiving recipe!
Followed the recipe to the letter and they turned out amazing. Wouldn’t change a thing. Thank you so much for the great recipe. I made a double batch to have some to freeze and I’m glad I did! I’ll be adding these in my sourdough rotation from now on.
I’m so glad you loved them. Thank you for coming back and sharing with everyone how it went for you.
Has anyone tried leaving the cut muffins to rest overnight in the fridge or would it be too long a rest? Then just cooking them in the morning.
I’ve left them covered for an hour on the counter and they were fine. They would develop more sourdough flavor that way. I think it should be okay if they are well covered. If you do try it please come back and let us know.
I let them sit overnight, covered, to intensify the sourdough flavor. The dough tends to flatten a bit, but that is to be expected. I re-shape them into a round circle before cooking by pulling the dough in with dough knife. That way they become a bit thicker, like the traditional muffins.
Oh that is a good tip! I’ve never left them overnight so glad we can answer that question.
i don’t have cornmeal, since it’s just for dusting can i omit it or use flour instead?
Yes that is just fine. The cornmeal just gives it an extra crunch.
Just made these for the very first time. I let my laeven sit out all night and started adding the rest of the ingredients around 10am. I did make a larger size due to my husband’s preference. I didn’t make any changes to the recipe and used the spent from my sourdough that I’ve had since January.
**Everything rose beautifully, including while they cooked.
Would this still work okay with non-dairy milk such as almond or hemp?
I’ve made it with almond and coconut milk and it works just fine. I figure hemp should work the same as well.
I’ve made them with half and half too and turned out great
That is good to know! Thank you for sharing Bex.
Accidentally mixed all the flour at first. Just going with it and will see what I get tomorrow!
I think you should be okay! Good luck!